Sharing is caring!
Tiramisu Cheesecake
Why You’ll Love Tiramisu Cheesecake?
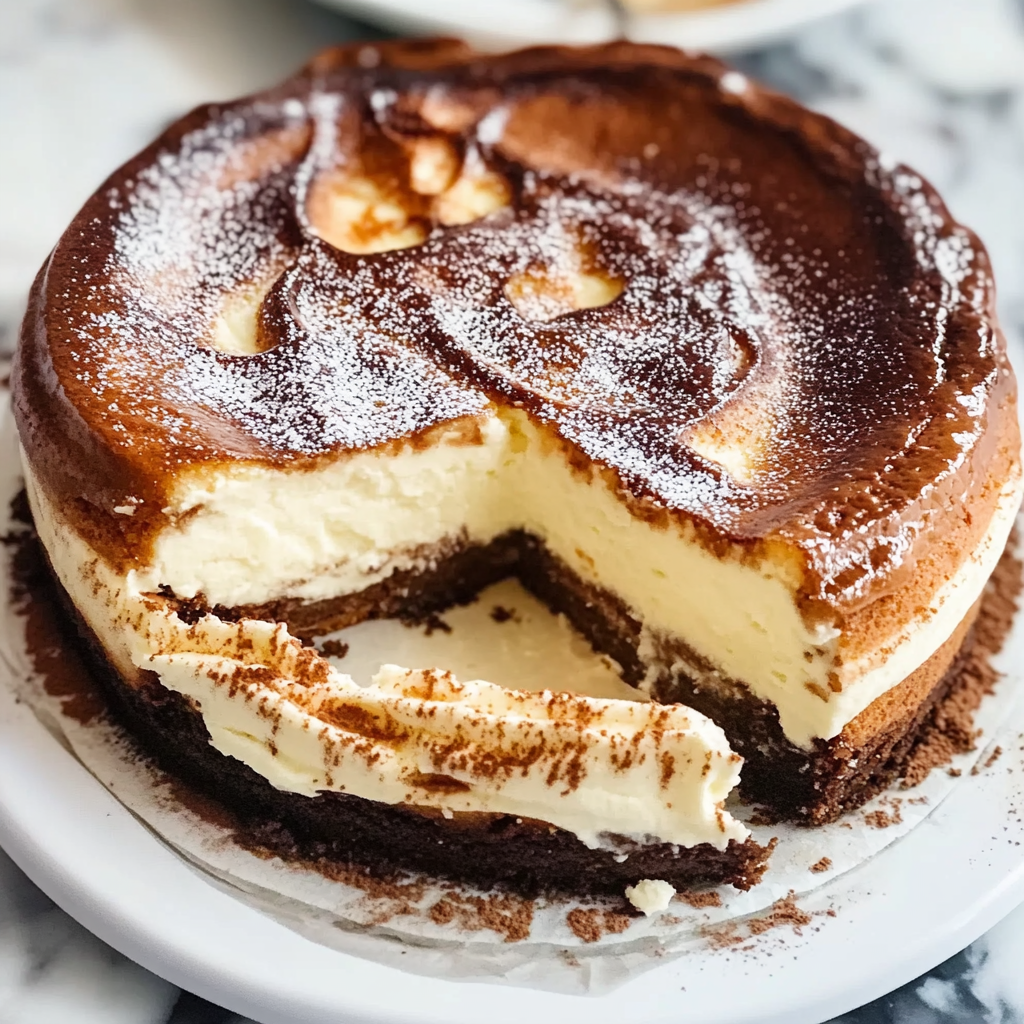
Tiramisu cheesecake is the ultimate dessert mashup, combining the rich, creamy texture of cheesecake with the bold coffee and cocoa flavors of classic tiramisu. Perfect for special occasions or a weekend treat, this no-bake dessert is surprisingly easy to make yet looks and tastes gourmet. Whether you’re a coffee lover or just enjoy indulgent desserts, this recipe is a must-try. For more decadent dessert ideas, check out our banana bread recipe for another crowd-pleaser.
Table of Contents
- Ingredients to make tiramisu cheesecake
- Time needed to make tiramisu cheesecake?
- Quick Steps to Make Tiramisu Cheesecake?
- Is tiramisu cheesecake healthy and nutritious ?
- Can I make tiramisu cheesecake healthier and still delicious?
- How to Serve Tiramisu Cheesecake?
- Avoid These Mistakes
- The best way to store leftover tiramisu cheesecake
- Ready to give tiramisu cheesecake a try?
- Frequently Asked Questions
Ingredients to make tiramisu cheesecake
- 1 ½ cups graham cracker crumbs
- 6 tbsp unsalted butter, melted
- ¼ cup granulated sugar
- 16 oz cream cheese, softened
- ¾ cup powdered sugar
- 1 tsp vanilla extract
- 1 cup heavy whipping cream
- 1 cup strong brewed coffee, cooled
- 2 tbsp coffee liqueur (optional)
- 24 ladyfinger cookies
- 2 tbsp cocoa powder for dusting
Optional Garnish: Chocolate shavings or fresh raspberries
Time needed to make tiramisu cheesecake?
Making this no-bake tiramisu cheesecake is surprisingly quick! Here’s the breakdown:
- Prep Time: 20 minutes
- Chilling Time: 4 hours (or overnight for best results)
- Total Time: 4 hours 20 minutes
Since there’s no baking involved, most of the time is hands-off chilling. For a faster set, check out our guide on quick no-bake dessert tips to speed up the process!
Quick Steps to Make Tiramisu Cheesecake?
Step 1: Prep the crust
Crush ladyfinger cookies into fine crumbs and mix with melted butter. Press firmly into a springform pan to form an even base. Chill for 10 minutes to set.
Step 2: Make the creamy filling
Beat cream cheese, sugar, and vanilla until smooth. Fold in whipped cream gently for a light, airy texture—this ensures your tiramisu cheesecake stays fluffy.
Step 3: Layer with coffee goodness
Dip fresh ladyfingers in cooled espresso, then arrange over the crust. Spread half the cream mixture, then repeat with another espresso-dipped layer.
Step 4: Chill to perfection
Refrigerate for at least 4 hours (overnight is ideal). The wait ensures the tiramisu cheesecake sets properly for clean slices.
Step 5: Dust and serve
Before serving, dust the top with cocoa powder or grated chocolate. Add chocolate shavings for extra flair.
Is tiramisu cheesecake healthy and nutritious ?
Tiramisu cheesecake is a decadent dessert that combines the rich flavors of traditional tiramisu with the creamy texture of cheesecake. While it’s undeniably delicious, it’s not the healthiest option due to its high sugar and fat content. However, it does provide some nutritional benefits, such as calcium from the cream cheese and a small amount of protein.
A typical slice of tiramisu cheesecake contains around 350–450 calories, with 25–30g of fat (mostly from cream cheese and heavy cream), 30–40g of carbohydrates (primarily sugar), and 5–8g of protein. If you’re looking for lighter dessert options, consider trying our green juice recipe or refreshing watermelon juice for a healthier alternative.
For those who love the flavors of tiramisu but want a slightly healthier version, you can explore pumpkin cheesecake or whipped cream-based desserts that use lighter ingredients. Moderation is key—enjoying a small portion of tiramisu cheesecake occasionally can still fit into a balanced diet.
Can I make tiramisu cheesecake healthier and still delicious?
Absolutely! You can enjoy a lighter version of tiramisu cheesecake without sacrificing flavor. Here are some smart swaps and tips to make this dessert healthier:
Healthier Ingredient Alternatives:
- Use low-fat cream cheese or Greek yogurt instead of full-fat cream cheese
- Try whole grain biscuit crumbs for the crust instead of traditional ladyfingers
- Substitute sugar with natural sweeteners like honey or maple syrup
- Use dark chocolate (70% cocoa or higher) for dusting instead of milk chocolate
Nutrition-Boosting Additions:
For an extra health kick, consider adding:
- A teaspoon of matcha powder to the filling for antioxidants
- Chia seeds to the crust for added fiber
- A sprinkle of cinnamon for blood sugar regulation
Remember, portion control is key – even with healthier ingredients. Try making mini tiramisu cheesecakes in muffin tins for perfectly controlled servings. These adjustments will give you a dessert that’s both delicious and better for you!
How to Serve Tiramisu Cheesecake?
This decadent tiramisu cheesecake shines when paired with the right accompaniments. For a coffee lover’s dream, drizzle each slice with espresso syrup or sprinkle cocoa powder for extra richness. If you prefer contrast, try fresh berries like raspberries or strawberries—their tartness balances the creamy sweetness perfectly.
For a brunch twist, serve it alongside a glass of citrus-infused juice or a frothy cappuccino. Want something indulgent? A scoop of vanilla bean ice cream turns it into an unforgettable dessert. For more pairing ideas, explore our tropical drink recipes to complement the flavors.
Garnish with chocolate shavings or edible gold dust for special occasions. For a lighter touch, mint leaves add freshness. If you’re inspired by classic pairings, whipped cream variations or spiced desserts can elevate your serving style.
Avoid These Mistakes
Making a perfect tiramisu cheesecake requires attention to detail. Here are common pitfalls to avoid:
Overmixing the Batter
Overmixing can incorporate too much air, leading to cracks. Mix just until ingredients are combined. For more dessert tips, check our banana bread guide.
Skipping the Coffee Soak
The ladyfingers need proper coffee soaking for authentic flavor. Too little makes them dry; too much turns them soggy. Find balance like in this pumpkin cheesecake tutorial.
Rushing the Chilling Process
This no-bake dessert needs at least 6 hours to set properly. Impatient slicing leads to messy servings. Learn proper chilling techniques from our quiche storage tips.
Using Low-Quality Mascarpone
Cheap substitutes ruin the texture. Invest in authentic mascarpone like professionals do in these tartlet recipes.
Neglecting Presentation
Dust cocoa powder right before serving to prevent moisture absorption. For plating inspiration, see our pineapple cake presentation guide.
The best way to store leftover tiramisu cheesecake
To keep your tiramisu cheesecake fresh, store it in an airtight container in the refrigerator for up to 5 days. For longer storage, wrap individual slices tightly in plastic wrap and freeze for up to 2 months. Thaw overnight in the fridge before serving. Avoid leaving it at room temperature for more than 2 hours to prevent spoilage. For more dessert storage tips, check out our banana bread storage guide or learn about freezing cheesecakes properly.
If you’re prepping ahead, assemble the tiramisu cheesecake without dusting cocoa powder on top—add it just before serving for the freshest look. For more no-bake dessert ideas, explore our pineapple juice cake or get inspired by mascarpone-based treats.
Ready to give tiramisu cheesecake a try?
This no-bake dessert combines the best of both worlds—creamy cheesecake and rich tiramisu—for a showstopping treat that’s surprisingly simple to make. Whether you’re hosting a dinner party or just craving something indulgent, this recipe delivers. For more decadent desserts, check out our moist banana bread or a tropical pineapple cake. If you love no-bake options, our savory vegetable quiche is another crowd-pleaser, or try a refreshing kiwi agua fresca to pair with it. Happy baking (or not baking)!
Frequently Asked Questions
Can I make tiramisu cheesecake ahead of time?
Yes! Tiramisu cheesecake actually tastes better when made a day in advance. The flavors meld together beautifully after chilling overnight.
What can I use instead of coffee in tiramisu cheesecake?
For a caffeine-free version, try using decaf coffee or substitute with strong brewed chai tea for a unique twist.
How long does tiramisu cheesecake last in the fridge?
Properly stored in an airtight container, it stays fresh for 3-4 days. For best texture, consume within 48 hours.
Can I freeze tiramisu cheesecake?
Absolutely. Wrap tightly in plastic wrap and freeze for up to 2 months. Thaw overnight in the refrigerator before serving.
Why did my tiramisu cheesecake turn out runny?
This usually happens if the cream cheese wasn’t fully softened or if the mixture wasn’t chilled long enough. Always chill for at least 6 hours.
Is there an alcohol-free version of tiramisu cheesecake?
Yes, simply omit the marsala wine or coffee liqueur. The dessert will still be delicious with just coffee flavoring.


